Your notebook may be old, but that doesn't mean its days are numbered. We'll show you how you can give new life into your portable by opening the hood and upgrading some basic components.
RAM
Time: 10 minutes
Adding or replacing memory has always been one of the simplest upgrades to perform on a laptop; even novice computer users should have no difficulty with it. And in our tests, this upgrade gave the most bang for the buck.
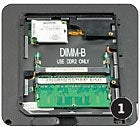
Most laptops have a panel on the underside that, when removed, exposes the DIMM slots for RAM (see photo 1 at left). (On some models, however, you must remove the keyboard to reach the slots; see the next paragraph.) To remove the panel--which is often labeled either with an M (for memory) or with a picture of a RAM chip--unscrew the holding screw or screws. Usually a single screw holds the panel in place, though some laptops may use as many as eight.
If you need to remove the keyboard, follow these steps:
- Remove the laptop's hinge cover by prying up the plastic.
- Detach the keyboard by taking out the two screws beneath the hinge cover that secure it, lifting it off, and then unplugging the connector.
(Reverse these steps when the new RAM is in place.)
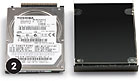
Hard Drive
Time: 60 minutes
Replacing a laptop's hard drive is almost always an uncomplicated affair, and the actual swap can be done in just a few minutes. Transferring the data from the old drive to the new one requires a little more planning, and typically takes an hour or so. This simple task is likely not only to give you more storage, but also to improve performance.
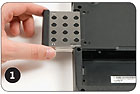
Hard drives are usually accessible via a side panel in your laptop and held in place by screws on the bottom. Remove those screws, and then slide the drive out of the machine (as in photo 1 here). The drive will most likely be attached to a sled (photo 2, at left). Remove the screws that are holding the drive in the sled, and remove the drive. Put the new drive where the old one was, and replace all of the screws in reverse order.If you are reinstalling Windows from scratch, boot from your installation disc and go to town. On the other hand, if you want to reproduce your old data and programs exactly the way you had them before, consider using cloning software to make an exact copy of the old disk.Finally, clone your old (now external) drive to your new (now internal) drive, and boot normally. You're done.
Wireless Card
Upgrading a wireless card is usually about as easy as upgrading RAM. In fact, on some machines, both the Wi-Fi card and the RAM are located under the same panel.
The trick is to make sure that you install a compatible part. Most laptops that were made a few years ago use Mini PCI cards, while newer ones use the Mini PCI Express standard. The latter type of cards have two separated sets of connectors along the narrower side; Mini PCI cards have only one set.
Even if the card you get has the right connector, it may not automatically work in your laptop: It's unlikely that you can upgrade your old 802.11b card to an 802.11n one (since few 802.11n Mini PCI cards have been made), but it's very likely that you'll be able to find an 802.11a/b/g card that works. Also, many systems that shipped with 802.11g cards can be upgraded to meet the latest 802.11n standard. To avoid firmware incompatibilities, we advise you to get this part directly from the manufacturer of your laptop; in any case, it should be sold specifically for your computer.
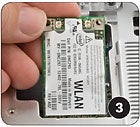
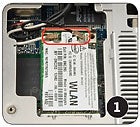
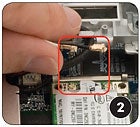
Once you have the right part, the upgrade is a snap. If your wireless card is under the keyboard, as ours is, remove the keyboard (see the next paragraph), locate the card (photo 1 at left), and disconnect the two antenna wires (one white, one black) by pulling straight up on the connectors; don't pull on the wires themselves (see photo 2, below).If you need to remove the keyboard, follow these steps:
- Remove the laptop's hinge cover by prying up the plastic.
- Detach the keyboard by taking out the two screws beneath the hinge cover that secure it, lifting it off, and then unplugging the connector.


No comments:
Post a Comment